Before you can put up your electric fence, there are a few preparations you must do.
1. The very first thing you must do is measure the parameter of the garden. It is important to plan to have a foot space between the edge of the garden and any plants that are close to the edge. You will use this measurement to determine how much electrical wire you will need and approximately how many metal stakes you should get.
2. Gather the necessary parts for the electric fence. They are listed below.
Materials Needed: ~Electric Fence Wire ~Electric Power Box (Select the best one that suits your gardening needs) ~Metal Stakes ~Grounding Post ~Plastic Hooks (2 per metal stake) ~8 Round Plastic Rings and 8 pieces of wire approximately 24 inches long (Corner connectors) ~Sledge Hammer/Pile Driver ~Wire Cutter ~Gloves (Optional; not pictured)
A common concern of all electric fence users is lightning strike and a blown up energizer. Mains units should be installed with lightning protection on both the incoming power side and the fence side. For incoming surge protection, a plug-in surge protector should be installed at the power outlet and the energizer plugged into the surge protector. This is the same type of protector as used on home computers and other valuable appliances and can be picked up at almost any appliance or variety store. Most rural electric systems experience daily variations in voltage flow that are as hazardous to electric fence energizers as lightning strikes and so a surge protector is good insurance for everyday usage. For lightning protection on the fence side, several practices are advisable. Location of the energizer is the first step. Place the energizer in a building in a low-lying area or a lightning rod protected building. Avoid placing it in a building on a hilltop with no lightning rods. Frequently there is no choice where the energizer is to be installed, but when there is a choice use common sense and stay away from lightning prone areas. The ground stakes should be well away from the ground system of power poles or the service box. Never use the existing ground system of power poles or breaker boxes for the energizer ground. A short in the power line can feed into the fence system through the common ground and create a dangerously charged situation in the fence as well as damage the energizer. A lightning strike on a power line with a common ground with the energizer creates a situation where the energizer could be damaged through both the incoming line and the ground system. The ground system for the energizer should be placed at least 25 feet from the nearest power line ground rod.
An induction coil or lightning choke should be installed in the fence lead-out wire near the energizer. The induction coil is made by coiling 6 to 8 loops of heavily insulated 12 gauge wire in an 8 to 10 inch diameter circle and taping the loops together. A lightning choke is made from a loose coil of hi-tensile wire with 8 to 12 loops spaced about 2 inches apart on a mounting board. Either device acts as a lightning brake by forcing the high voltage lightning surge into a circular flow and creating a resistance field by which the flow of lightning energy is reversed. The energy flow goes back up the fence and away from the energizer. The induction coil is much easier to assemble and is our preference. Once we started using induction coils in our installations we virtually eliminated all damage to energizers due to lightning strikes. A lightning diverter should be installed where the lead-out wire attaches to the fence. A lightning diverter at this location serves the double purpose of diverting some of the initial energy surge to ground and serving as a route of exit from the fence of the energy flow reversed by the induction coil. This device has two terminals for attaching wires and leads from each terminal that are set with a wide enough gap to prevent the normal energizer voltage flow from arcing across, but close enough to allow a lightning voltage spike to jump easily across and pass to ground. The top terminal is attached to the uppermost electrified wire and the lower terminal to a ground rod. The lightning diverter ground must be separate from the energizer ground. If a common ground rod is used, the lightning spike can pass through the common ground system and return to the energizer potentially damaging the circuitry. It is relatively cheap insurance to install several lightning diverters through the fence system at lightning prone locations and where fences network together. Ideally, more total ground rod capacity should be installed under the lightning diverter system than under the energizer itself. Several types of lightning diverters are available, but all work on the same principle.
Just as the energizer should be matched to the size of the fencing job, the solar panel must match the energy draw of the energizer. For each 1 joule energizer output, allow seven watts of solar panel capacity in high sunlight areas and ten watts in low sunshine areas. In Missouri the seven watt capacity has proven adequate in most conditions, but in wet cloudy springs seven watts has proven inadequate for keeping batteries fully charged. Solar panels should be oriented from due south to no more than 20 degrees to the southwest. The logic for orienting the panel slightly to the southwest is because mornings are often cloudy with clearing in later afternoon, particularly in the spring and fall when day length is shorter, thus more hours of intense radiation occur when the sun has already progressed to the western portion of the sky. The panel should be oriented so many degrees off horizontal based on your latitude. Because the angle of the sun's rays striking the earth differs through the seasons, the efficiency of a fixed orientation varies seasonally. For panels used only during the spring to fall grazing season, 25-30 degrees off horizontal may be appropriate. Winter grazing requires a panel more steeply inclined, up to 60 degrees off horizontal with a south to southwest orientation.
The particular model of energizer to choose depends on the total distance of fence to be charged. Manufacturer's claims on this point can be very confusing. If the energizer has a joule rating assigned to it, it should be simple to determine how many joules of power are needed for your situation. However it is not so simple. One major fence company makes energizer recommendations based on the premise of ½ mile of fence per joule of energizer capacity. Another manufacturer suggests up to 10 miles of fence per joule of energizer capacity. The first company is presenting a worst-case user scenario while the other is presenting a best-case scenario. Our experience has been that allowing one mile of fence per joule output will give satisfactory performance in most situations. The type and construction of the fence affects the total mileage capacity of the energizer. Single wire paddock subdivision fences for cattle are generally well up out of the vegetation and, if well constructed from high quality material, several miles of this type fence can be electrified for every joule of energizer output. Multi-strand perimeter fences and three strand sheep paddock fences may carry very heavy vegetation load on the lower wires and much less total distance will be served by the same energizer as used in the single wire situation.
The next decision to make is whether to use a battery unit or mains unit. This choice depends mainly on availability of 110v or 220v power source. In almost all situations where power is available, it is advisable to use a mains unit. Mains units are invariably cheaper per unit of output power than battery units. Worries about keeping batteries charged up and the fence hot are eliminated by mains power. Monthly electricity cost for operating mains units, based on $.08/kWh, range from less than $.05/month for small units to around $1.50/month on very high-powered units. Even if a mile of feeder wire is required to bring power from a building housing the mains unit to the actual pasture, it will generally be cheaper in the long run to do this rather than use a battery unit with solar recharging of a battery. Available mains power units run from less than 1 joule output to 20+ joule output. If mains power is not available and a battery unit is required, there are many sizes and types to choose from. Self-contained lantern batteries, either 6 or 9-volt cells or a multiple of ‘D’ cells, may power very small units with less than 1 joule output. New technology in dry-cell and gel-cell batteries has increased the time period which battery units can be operated between recharges or replacement. Gel-cell batteries are generally designed to be recharged but require special chargers to maintain battery life. A new generation of long-life, disposable dry-cell batteries offers potential for more than six months battery life. For remote units that are not visited on a regular basis, these long life battery systems offer greater management opportunity than has previously existed without use of solar recharge systems. Current technology in “smart” energizers allows for even greater battery life. Smart energizers detect the load upon the fence and adjust pulse output to the demand. If load is minimal, the battery draw is reduced and battery life is prolonged. Larger wet-cell units up to over 20 joule output can be powered by 12v automotive type or deep cycle gel batteries. When using 12v systems, it is highly advisable to install a solar panel to keep the battery charged. The higher the output of the energizer, the more rapidly a storage battery is drained. The largest wet-cell battery units may fully drain a deep cycle 12v battery in less than a week. To avoid the weekly turnaround of batteries, a solar recharge system is a must. There are also energizers available that can be used either as 12v battery or 110v mains units. These units offer a great deal of versatility in use. Some graziers are concerned about controlling animals if the power goes off for an extended period due to weather events such as hurricanes and ice storms. The dual power units offer the opportunity to switch to battery power if the mains power is out for more than a few hours. They can also travel from the home base of operations to a remote grazing location to be used with battery. These units can work well for custom graziers operating on leased land. Some people have the perception that battery units are inherently less powerful than mains units. When comparing units with the same output joule rating, the capacity to energize a given length of fence are the same, as long as the battery is fully charged. It is only when the battery has been partially drained that battery units can be considerably weaker than their mains counterparts. Using a solar or wind recharge system can eliminate the weak battery failure.
Modern electric fence energizers have the capacity to maintain effective voltage for animal control under much more adverse vegetative load conditions than earlier types. Low-impedance is the term most commonly used to describe the modern energizer. Low-impedance energizers are characterized by moderate voltage and a very short pulse length. Manufacturers have attempted to rate the power capacity of fence energizers by several methods including miles of fence powered, farm acreage covered, voltage output, effective voltage under varying resistance levels, and joules of energy. Each of these ratings has its limitations. Miles of fence powered is meaningless unless the wire gauge, vegetation load, quality of fence construction, and other factors are specifically indicated. Size of the farm means nothing without some idea of the level of paddock subdivision on the farm. Voltage output is generally peak voltage potential with no fence attached to the energizer or "no-load" voltage, as it is commonly referred to. An energizer with 15,000 v no-load potential may actually be considerably less powerful than a unit with 5000 v no-load. Joules are the most common means of comparing fence energizers. One joule is equal to an electrical output of 1 watt per second. Comparison by joule output is only valid if the pulse lengths are similar and if measured at comparable resistance levels. Most manufacturers rate their units based on output energy. This is the amount of energy the unit consistently pulses into the wire. A few companies use stored joules to rate their units. Stored joule measurements are usually 20-30% greater than output
2 joules so units cannot necessarily be directly compared across manufacturers. For example, a 10- joule stored energy output energizer is equivalent to a 7 to 8 joule output energy-rated unit. Very often the energizer model number itself tells what the energizer capacity is in joules. The two units shown below are examples where the ‘M’ indicates they are mains (110v plug-in) units and the numeral specifies the output joule rating. The M1000 has 8 times the output power of the M150. This does not mean it produces a higher voltage on the fence line, only that it will maintain the power level on six times as much fence. With these points in mind, how does one go about selecting the proper energizer for a particular situation? You need to consider how many miles of fence will you have, will it be single or multiwire, what is the expected vegetative load on the fence, what type of livestock or wildlife are you attempting to deter, and what is available as a power source.
Selecting and installing the most appropriate fencing system for your grazing operation is a key step toward successful pasture-based livestock production. Three types of fencing are likely to be used in a grazing cell: perimeter, permanent subdivision, and temporary or portable subdivision fencing. Electrified 12.5 gauge hi-tensile wire makes most satisfactory perimeter fence and permanent paddock fencing. Numerous options are available for portable fencing. This guide deals with material selection and proper installation of all types of electrified fences for grazing systems. Materials are covered in individual sections.
Electric fences are an important tool for protecting livestock in Alberta. Such fences have been used in the province to protect livestock from predators for more than two decades.
Predators such as coyotes, wolves, bears and domestic dogs are shocked when they try to penetrate an electric fence. For the most part, electric fences have been used to protect pastured sheep; however, these fences do have other applications. They can be used around birthing yards to protect newborn calves or lambs, or they can serve to protect poultry and farmed deer.
A study in the mid 1970s showed a 90 per cent reduction in sheep predation losses on farms with electrified pasture fences. This evaluation of electric fences to protect sheep from coyote predation was conducted by Alberta Agriculture, Food and Rural Development. Other studies have confirmed the effectiveness of electric fences to prevent sheep predation.
Electric fences are easily adapted to most livestock operations. These fences are relatively easy to maintain and are economical to build. However, electric fences require routine inspection and maintenance to ensure proper operation and protection capability. Also, snow and frozen ground in winter can greatly reduce the effectiveness of electric fences for predation control.
Electric Fence Designs
An effective electric fence for predator control can be constructed with either a multiple of single strand wires or a combination of wire mesh and single strand wires. A mesh-wire fence is more expensive to build than a fence made from single strand wire. However, an electrified mesh-wire fence presents a greater physical barrier to predators and requires less maintenance and fewer electrified wires than a fence using only single-strand wires.
Nine-wire fence An electric fence made with 9 single strands of 12.5 gauge, high-tensile smooth wire and spaced as shown in Figure 1 provides an effective barrier to predators. The overall height of this fence design is 1.37 m. Wires are alternating, charged (+) and grounded (-), beginning with the bottom wire as a charged wire. The top wire should be charged when cattle or horses are either enclosed or share a fence to prevent them from damaging the upper portions of the fence.
Figure 1.Nine-wire fence, viewed from inside of the fence .
Mesh-wire fence Galvanized, high-tensile mesh wire should be used for predator control. This wire is more versatile and longer-lasting and can be stretched tighter than standard farm mesh wire. The high-tensile mesh wire is reasonably priced and available from fencing suppliers in various heights. Galvanized mesh at least 1.2 m high with predator-proof spacings (smaller spacings on the bottom section of the mesh than at the top section) is recommended.
To build a new fence, place the mesh wire on the inside of the pasture posts. Pull the mesh taut, position the bottom of the mesh tight to the ground and staple the mesh securely to the posts. The fence wire must be tight to the ground to reduce the chances of a coyote digging under.
If a fence is not taut, the wires will sag and make a space easier for coyotes to penetrate. Single strand, 12.5 gauge high-tensile wires can be placed 15 cm or less apart above the mesh to increase the height of the fence to 137 cm or more. Figure 2 shows the recommended mesh-wire fence configuration, which is also electrified.
Figure 2. An electrified, high tensile mesh-wire fence, viewed from outside the enclosure .
An existing sheep fence made from mesh and barbed wire can be electrified. The fence must be in good condition, and the wire must be free of rust, undamaged and taut. The spacing in the mesh wire must be no larger than 15 cm by 15 cm. Coyotes, foxes and small domestic dogs may crawl through spaces larger than 15 cm. Fence posts must be sturdy and preferably tall enough to make the fence at least 137 cm tall. If the posts are not tall enough to support the top wires, add extensions to increase post height to at least 137 cm.
Considering the requirements for an effective electric fence for predator control, it is often impractical to modify an existing mesh-wire sheep fence.
Predators can penetrate a fence by digging under, jumping between the wires, crawling through holes in the mesh or jumping over the top of the fence. To stop predators from digging under the fence, place a charged 12.5 gauge high-tensile wire 10 - 15 cm above ground level and 10 - 20 cm out from the mesh.
If the fence posts are 10 cm or more in diameter and the mesh is attached to the inside of the posts, insulators and the charged wire can be attached directly to the outside of the posts. If the fence posts are less than 10 cm in diameter or the mesh is on the outside of the posts, offset brackets will be needed. Brackets can be built or purchased.
Damaged mesh or mesh with openings larger than 15 cm by 15 cm may allow coyotes, foxes and small domestic dogs to crawl through the fence. Repair or replace damaged mesh. Add one or more strands of high-tensile smooth wire, spaced 15 cm apart, above the mesh to increase the total height of the fence to at least 137 cm. This is the minimum height needed to prevent coyotes from jumping the fence. Make sure the mesh and single wires are taut. If horses or cattle are enclosed by the fence, electrify the top wire to keep them from pushing on the wires.
How An Electric Fence Works
For electricity to flow in a system such as an electric fence, there must be a complete and uninterrupted (closed) circuit. The electrical current must travel from its source (fence energizer) through the circuit (fence) and back to the source. This flow only occurs when a charged wire of the fence becomes grounded.
Under normal operating conditions, an electric fence functions as an incomplete (open) circuit with repeating pulses of electricity generated by the energizer sent through the charged wires of the fence. When an animal touches a charged wire, it grounds the fence, creating a closed circuit. An electrical pulse travels through the animal and back to the energizer, delivering a shock to the animal.
Other objects and materials including vegetation, sticks, fallen trees and non-insulated posts in contact with charged wires can also create a partial or total closed circuit. This partial or closed circuit can result in a reduced electrical charge (voltage) and an inadequate shock to repel predators that contact charged wires of the fence. Fences should be checked and maintained regularly to address this potential problem.
A shock from an electric fence that uses charged and grounded wires can be delivered in either of the following ways; see Figure 3:
A predator receives the maximum shock when it touches a charged wire and a grounded wire at the same time. Electricity in the charged wire travels through the predator into the grounded wire and back to the energizer.
The conductivity (how easily electricity flows through a circuit) is very high. This conductivity forms the basis for recommending that all non-charged wires on an electric fence be attached to the ground rods of the energizer.
When a predator touches a charged wire only, electricity travels through it into the soil, through the soil to the nearest ground rod and attached grounded wires to the energizer. Conductivity through soil, depending on soil type and moisture, is poor compared to wire. Therefore, the shock a predator receives in this way can be much less intense than that received from contacting both a charged and grounded wire at the same time.
The closer a predator is to a ground rod when shocked, the more intense the shock will be. It is therefore very important to ground non-charged wires to ground rods at regular intervals of the fence.
Figure 3.The ways current can flow when a predator touches an electric wire.
Fence Line Selection and Preparation
Careful planning and proper fence line preparation are important first steps in the construction of an effective fence for predator control.
Select the most level ground to run the fence. Do not cross creeks, sloughs, ravines or other unstable and difficult areas if at all possible. Keep the fence line as straight as possible. Clear trees, shrubs and debris from the fence line. Make the fence line wide enough both to prevent trees from falling on the fence and to permit a vehicle to be driven beside it for fence construction, inspection and maintenance.
Coyotes usually penetrate mesh or nine-wire fences by digging or crawling under the bottom wire. So, it is extremely important to level the fence line properly. The fence line must be even enough to run a charged wire within 7.5 to 10 cm of the ground. The distance from the bottom wire to ground level may vary a good deal if fence lines are not levelled. An uneven fence line may permit coyotes to get under the wire. If the charged wire touches the soil, the voltage may be inadequate to keep coyotes out.
After completion of the fence, the fence line should be re-seeded to grass to prevent erosion and weed growth. Select a low-growing grass species that will minimize the risk of vegetation grounding the bottom charged wire. Common broad-leaved weeds that cause grounding problems can be controlled with herbicides.
In 1938, the first electric fence was developed in New Zealand by Gallagher. Since that time, electric fencing systems have made farm and ranch life easier. Today, both permanent and portable electric fencing products are used all over the world.
Basics of Electric Fencing
Electric fencing is ideal for grazing or pasture management by containing animals on a selected area of pasture or crop. It also may be used to protect gardens and landscapes from animal damage.
Permanent electric fencing is economical, easy to install and easy to maintain. Temporary electric fencing is an effective temporary barrier for short-term animal control and rotational grazing.
Electric Fencing is...
Safe: Animals remember the short, sharp but safe shock and develop respect for the fence.
Easy to install: An electric fence takes less than half the time to build compared to traditional fence systems.
Durable: A non-electrified fence experiences constant wear and tear under stock pressure. Because your animals learn to avoid an electrified fence, your fence will last longer and remain in good condition.
Economical: Electric fences cost less than 50% of traditional non-electric fences.
How does an Electric Fence work?
Electric current (AMPS) only flows when a circuit is completed between a positive and negative terminal.
In this diagram the current cannot flow from the positive terminal to the negative terminal because the switch is open.
In this second diagram, the switch is now closed, allowing the current to flow from the positive terminal through the light bulb (lighting the bulb) to the negative terminal.
An electric fence circuit is made on a larger scale. The energizer fence terminal (positive) is connected to the insulated fence wires, and the energizer earth terminal (negative) is connected to galvanized metal stakes driven into the ground.
The same 'circuit completion' (as in the second diagram) is necessary before the animal gets a shock. An animal standing on the ground and touching the electrified wires will complete the circuit like the closed switch in the second diagram above.
For example, a bird sitting on the wire will not receive a shock. It is not touching the ground so the circuit is not completed. A person wearing insulated footwear will only receive a small shock because all the current cannot pass through the insulated soles.
Dry, sandy or pumice soil is a poor conductor of electric current, so it is a good idea to add an ground (negative) wire into the fence. The animal must touch both a hot wire and ground wire to feel an effective shock.
Choosing the Right Energizer/Fence Charger
Once you have decided what type of electric fence you want for your property, you will need an energizer also known as a fence charger to power it. The correct energizer size for your property is determined by the type of animal to be fenced, distance of fence to be powered and the number of wires in the fence.
There are two types of energizers:
Mains powered - these are energizer units which are plugged into a mains power supply.
Battery/Solar powered - these are energizer units which can be left out in your paddock and require a battery to run them. Two batteries can be rotated on a regular basis or a solar panel can be an effective means of continuously charging your battery.
Steps to Good Grounding
Grounding (a.k.a. earthing) is perhaps the most neglected component of many fence systems. We recommend three ground rods, 6’ deep and spaced 10’ apart are the minimum recommendation. Never attach copper to steel. Electrolysis can occur and result in corrosion which weakens shocking power. Use galvanized ground wire and grounding rods to avoid this problem.
Consider that most energizers use galvanized or stainless steel terminals – not copper. Think of your ground system as an antenna that gathers electricity in order to deliver the shock to the animal. Modern satellite receivers can tune in to more television channels than the “rabbit ear” antennas of the past. A hose clamp holding a piece of copper wire to a rusty t-post has been the weakest link of many electric fence systems.
- See more at: http://www.gallagherusa.com/electric-fencing/electricfence101.aspx#sthash.znQ0H6eX.dpuf
Multi-species grazing isn’t just about diversifying your operation and making good use of your pastures. It can also be a way to protect small ruminants from predation!
2. A mixed-species group of animals that consistently stays together under free-range conditions.
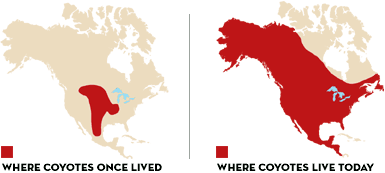
Losing animals to coyotes is no longer just a western problem. These two maps from the National Wildlife Federation show how coyotes have expanded their range. No matter where you live, even in urban areas, coyotes might be looking to snack on your small ruminant, or your cat or dog.
When the Jornada Experimental Range (JER) outside of Las Cruces, New Mexico expanded their range livestock research program to include sheep alongside cattle, they ran into a problem that anyone raising small ruminants has encountered: predators, mostly coyotes, began picking animals off. In fact, they lost 66% of the herd, dropping from 96 to 33 sheep in just one year. As Dean Anderson wrote in his 1998 paper in the Journal of Arid Land Studies, this catapulted them into predator control research. They ended up with a two-pronged approach that all but eliminated predation by coyotes. The solution? They got guard dogs to stay with the herd, and they taught the sheep to stay with the cows. The researchers started with two observations. First, free-ranging sheep don’t normally stay with cattle in the same pasture. In fact they interacted less than 6% of the time. Second, they had seen how aggressive cattle could be towards dogs, especially when they felt threatened. They figured that this aggression towards threatening dogs would translate to coyotes as well, and that if the sheep behaved as part of the cow herd, they’d have more protection. And with that, they began to figure out the logistics for bonding sheep, goats and cattle.
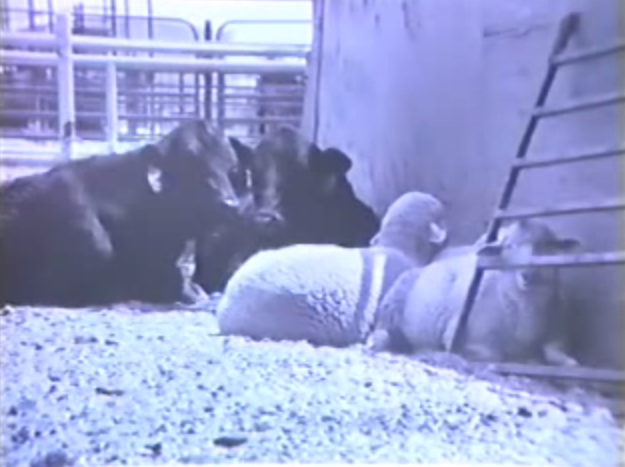
Here’s a 1987 JER picture showing bonding in progress. The sheep do not bond to an individual cow but to the species in general.
Pen Bonding
They started by penning young lambs with cattle for 3o days. All were fed together, though there was a creep to allow the lambs to escape to a safe place if necessary. That’s about all it takes, for sheep to bond to cattle. Further research has revealed that a good bond can be achieved in just 14 days, making it easier to get started flerding.
As all good researchers do, Dean Anderson and the folks at JER did a test to see if they were getting the results they hoped for. It involved sending a trained herding dog to round up cattle and sheep while they filmed what happened. The dog had a hard time with the control group because the sheep refused to move with the cattle, and ran off by themselves. The job was much easier for the dog when it came to trying to move the flerd. The sheep moved with the cattle, generally traveling in the midst of them, and the cattle did their job of occasionally turning on the dog to protect themselves and the sheep by extension. It’s easy to see from Dean Anderson’s 1987 video of the test that flerds provide a lot of protection to sheep and goats.
The biggest issue/expense in creating a flerd is feeding the animals while they’re bonding. Fortunately, you don’t have to train every member of your flock. By taking advantage of the flocking instinct of your small ruminants you can provide protection to unbounded animals. Bonded animals, will stick with the cattle, and those without a bond to cattle will stick with their flock mates. Jornada researchers found that 12 bonded sheep controlled the movements of 12 non-bonded sheep. You can see this at work in Dean Anderson’s video below.
At the Jornada Experimental Range, researchers use this herd behavior to introduce new lambs to the flerd. Ewes are removed from the range to give birth in a corral where they remain for about 2 months while the lambs grow and gain strength. Then the ewes and lambs go back on the range with their cattle flerd. Though the lambs spend about 3 months with the cattle as part of the flerd, the bonding process doesn’t really seem to begin for them until after weaning. It’s possible that they are simply too focuses on their bond with their mothers. After weaning, as they continue to follow their mothers and the flerd, the bond begins to form. After 217 days with the flerd, their bond with cattle is as strong as pen-bonded lambs that spent 34 days with heifers before joining the herd.
Flerd Benefits
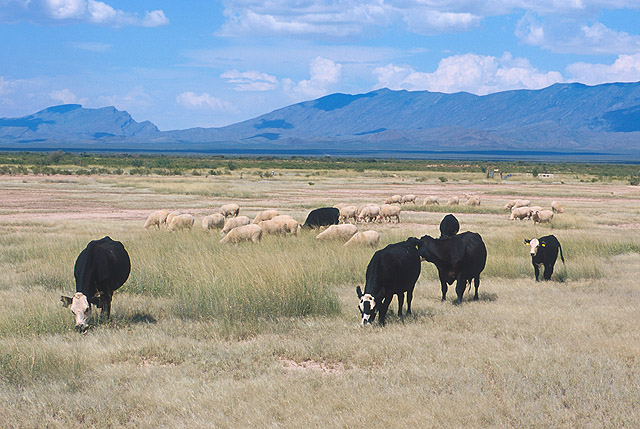
Photo courtesy of Jornada Experimental Range
There are management and pasture benefits to be gained by running sheep and cattle together. Sheep-proof fences on the range are no longer required because the sheep will stay with the cattle. Any fencing that will keep cattle in a particular pasture will keep the sheep with them, as long as their are no cattle in the adjacent pasture. Sheep aren’t bonded to a particular cow or herd, they are bonded to all cattle, so will move to other cattle readily given the opportunity. It’s also easier to find your small ruminants on large ranges, in dense brush or in fog or snow because the size of the cows makes the group easier to see. Finally, cattle tend to range over a larger area when foraging than sheep and other small ruminants. Sheep in flerds stick with the cattle, distributing foraging over a larger area than possible with just a flock.
It’s also important to note that flerding replaced other ways of trying to prevent coyotes from eating sheep. Before flerding Anderson says “we relied on gunning, trapping, snares, electrified fences and guarding dogs.” Post-flerding, they only used Turkish Akbash guard dogs.
Ready to Give Flerds a Shot? Here Are Some Tips
1) Use sheep and goat breeds that exhibit flocking tendencies. Researchers found that white face sheep breeds may bond better than black face breeds based on their flocking tendencies. They also found that spanish goats could bond, but that over time, they became less bonded and wandered away from the herd more.
2) Younger animals bond better than older animals. Researchers have done this with 1 day old lambs, and with yearling ewes with good results. Jornada researchers were successful with lambs 45, 62, and 90 days old as well as with 18 month old ewes.
3) Any age docile cattle will do, but keep in mind that heifers eat less than a full grown cow and will reduce the costs of the bonding process. If you find a cow abusing lambs, remove it immediately because there’s no way to make lambs bond with their abusers.
4) Bond strength is measured by how far sheep stray from the cattle. The stronger the bond, the shorter the distance between sheep and cattle. Bonds can be created in as little as 14 days.
5) Pens should be in quiet areas with little activity. The size of your pen will determine the ratio of cattle to sheep for the training. In smaller pens (52 square feet per animal), Jornado researchers used one cow per 3 lambs, and in larger pens, (188 square feet per animal) they used one cow per lamb.
6) Provide a creep area for the small ruminants as a place to escape if threatened, and to provide supplemental feed for growing lambs and kids. Feed hay on either side of the creep for the first 24 to 72 hours so animals can see each other, yet lambs have some degree of safety as they get to know the larger cattle.
7) Consider putting bells on some cattle during training. Lambs will learn that the sound is associated with where they ought to be, and help orient them in larger pastures.
- See more at: http://onpasture.com/2014/06/23/flerds-sheep-and-cattle-grazing-together-for-pasture-management-and-predator-protection/#sthash.FVz15l3I.ojqkDiqo.dpuf


 Print
Print Email
Email