September 26, 2014
September 26, 2014
Electric Fence Construction, Product Selection and Trouble-Shooting
|
|
September 25, 2014
i SERIES FENCE ENERGIZER SPECIAL REBATE OFFER
Purchase an M2800i or a M2800i fence charger along with a i Series Remote and get a FREE Fence Monitor after completing mail-in rebate.
Download the form: REBATE FORM.Offer is valid only on product listed on rebate form. Rebates must be postmarked by December 31, 2014 to qualify.
September 24, 2014
PULAKSI COUNTY KY FENCE BUILDING SCHOOL
|
|
September 24, 2014
UNIV KY FENCE SCHOOL
|
|
September 24, 2014
Keystone International Livestock Expo
This event is an annual livestock event - Equine, Cattle, Swine, Sheep and Goats and is one of the largest of its kind in North America. Entry to the event is Free.
Gallagher will be represented by dealers at this show. Valley Farm Supply: New Providence, PA, valleyfarmsupply@aol.com
Learn more at: http://www.keystoneinternational.state.pa.us/page/show.aspx
September 15, 2014
Fence Design and Layout....What kind of fence should I install?
The kind of fence that should be installed depends
upon:
• Purpose of the fence
• Kind and class of livestock to be contained
• Operator preference
• Predator control
• Cost
Permanent or temporary fences may define
paddocks within the grazing unit. During initial
stages of paddock layout many producers prefer to
use temporary fences to create paddocks and lanes.
This allows for easy adjustment of the layout as
producers learn what size paddock they need, how to
easily accomplish livestock movement, and how
forages react to managed grazing. After gaining
experience, the producers usually install some type
of permanent fence to define paddocks and lanes.
A. Permanent Fences:
Permanent fences are used for the perimeters of
pasture systems, livestock corrals, and handling
facilities. Sometimes they are used to subdivide
pastures into paddocks. This is especially true
for certain kinds and classes of livestock, such as
bison.
1. High Tensile Wire Fences
This is a relatively new type of fence, which has
become increasingly popular in recent years.
Typically perimeter fences are 4-6 strands of
wire and interior fences are 1-2 strands of wire.
Advantages:
• Relatively easy to install and maintain.
• Can be powered to provide a psychological as
well as physical barrier.
• Several contractors available to do installation.
Disadvantages:
• Requires some special equipment, such as a post
driver for installing wooden posts.
• Fences with several strands of wire are not easily
moved.
• Wire is difficult to handle if fence is to be
moved.
2. Woven Wire Fences
Woven wire is a traditional type of fence. It is
used primarily for hogs and sheep. Woven wire
fences normally have one or two strands of
barbed wire installed above the woven wire.
Advantages:
• Not dependent on electrical power. Is useful in
remote locations.
• Provides barrier for smaller kinds of livestock
(sheep, hogs).
Disadvantages:
• Cannot be powered, provides only a physical
barrier.
• Requires much labor to install.
• Not easily moved.
• Weed and vegetative growth promotes snow
piling.
3. Barbed Wire Fences
Barbed wire is a traditional type of fence, which
is still quite popular. Barbed wire fences should
be at least 4 strands for perimeter fences. When
used for interior fences, they are typically 3 or 4
strands. Barbed wire should never be electrified
because of greater potential for animal injury.
Advantages:
• Not dependent upon electrical power, thus is
useful in remote areas.
• Most producers are experienced with
construction of barbed wire fences.
Disadvantages:
• Not easily moved.
• Provides only a physical barrier.
• Susceptible to damage from snow accumulation.
September 14, 2014
A Great Grazing Systems Planning Guide
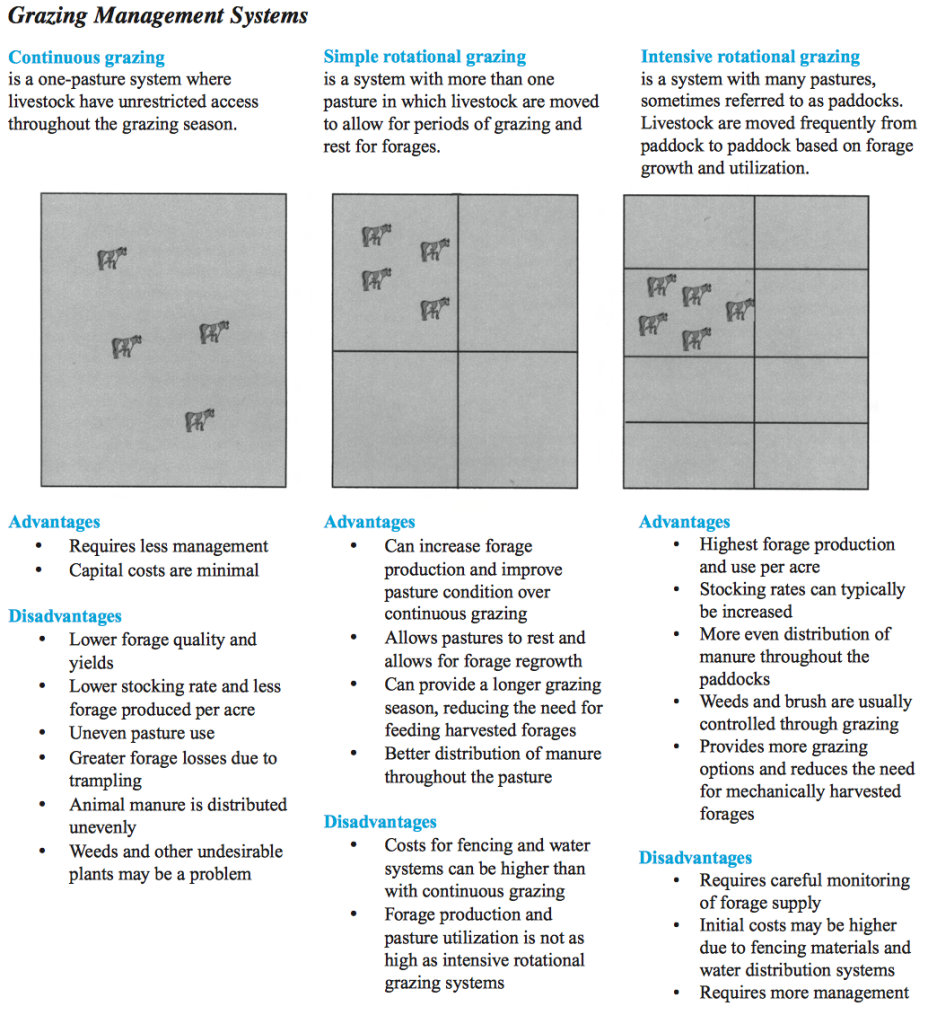
Pictures and simple tables. That’s what I like in a book, especially if they illustrate what the author is trying to explain in a way cuts to the chase. If you like that too, you’ll really appreciate this Grazing Systems Planning Guide by Kevin Blanchet, Howard Moeching, and Jodi DeJong-Hughes of University of Minnesota Extension. Here are some examples: Are you wondering what you’re getting yourself into if you switch from continuous grazing to something with more management? Here you go… pictures and a table of the advantages and disadvantages laid out quickly and simply.
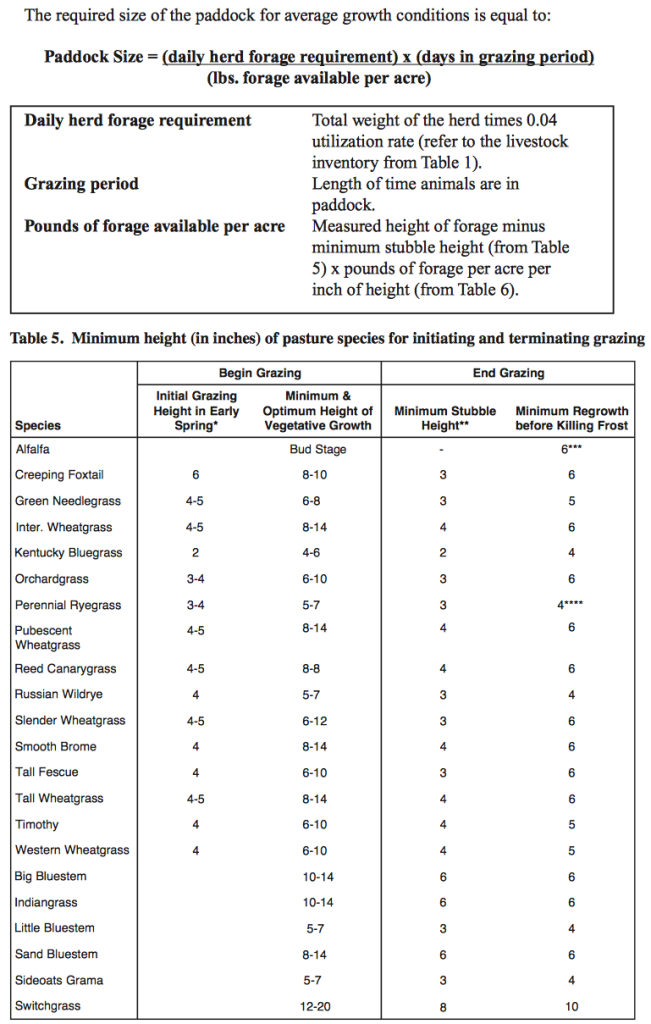
A paddock layout isn’t an easy thing to draw up. It’s complicated by where your water source is, what forages are in the different paddocks, and how much time they need to recover after being grazed. If all that leaves you scratching your head or thinking of just chucking the whole idea of management-intensive rotational grazing, check out this guide. It comes with the formulas you need for figuring out how much forage you need, how much forage you might expect from different species, and what their beginning and ending heights should be.
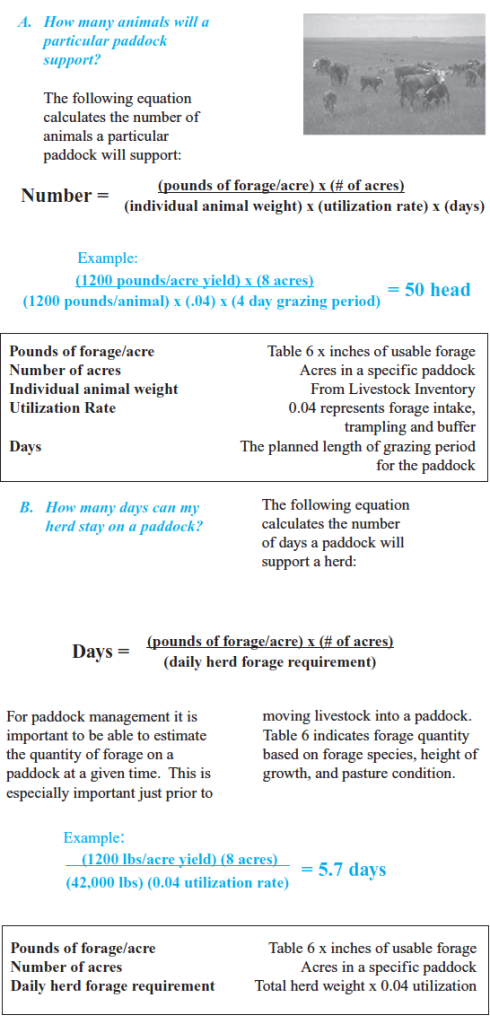
There are even easy to understand formulas that you can use to estimate how much time your livestock can stay in each pasture so that when grazing season arrives, you can do more than guess.
This handbook has a lot to recommend it, including the clear, to the point language the authors use to help you get started. It’s only 32 pages long (plus some appendices with more pictures and tables) yet it covers the topic in enough detail to make sure you can get going, collect information about your successes and challenges along the way, and then know what questions you might ask if you’re looking into something in greater depth.
September 14, 2014
Managing Grazing to Improve Stream Corridors Part II
In Part I of this series, we looked at a variety of ways to create paddocks so that we could water livestock from streams while at the same time managing them to improve stream corridors. But in some cases, using streams as a water source can lead to damage, or can prevent livestock from grazing paddocks well. A simple solution can be placing a water tank in the streamside paddock at some distance from the stream. This solution coincides with research showing that livestock will water from the tank more often than from the stream, especially if direct access to the stream is difficult. In addition, most livestock would prefer to drink from still water and prefer warmer water to the cold water from spring-fed streams.
Getting Water to the Tank
Livestock Operated Pumps
Livestock operated pumps are many times referred to as “pasture pumps” or “nose pumps.” These pumps are actuated by the livestock pushing thepump arm with their noses to pump the water from the source. The typical source is a pool of water in the stream. The inlet to the pump is suspended in the water to prevent it from sucking in mud. A one-way check valve is installed at the inlet so that the water in the pipeline feeding the pump does not have a way to return to the stream, thus keeping the pump primed.
These pumps work quite well, but keep the following in mind:
• They can handle approximately 30 cows per pump, so you may need more than one available to each paddock if your herd is larger than that.
• They are portable. It is a good idea to leave the inlets in place and move the pump to other established inlets to save time in setting them up.
• You must prime the pump initially for the livestock.
• Small animals, such as calves or sheep, will not be able to operate the pump. In cow/calf operations, a small pan is sometimes installed under the pump to catch overflow for the calves.
• The pump is limited to a distance of 150 feet from the water source. It will lift water about 26 feet, but only if placed close to the source of water. It is more difficult to operate as it has to lift water higher.
• It requires no electricity to operate.
(Here’s an additional On Pasture article on nose pumps.)
Sling Pumps
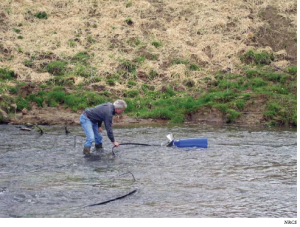
Sling pumps float in a stream and the movement of the current on the blades causes the blades to spin. Th e pump picks up water from the stream and moves it through internal tubes to the pump outlet through a hose to a watering facility. Th ese pumps come in various sizes. Th e smallest one can pump 550 to 830 gallons per day depending upon the velocity of the stream.
Keep the following items in mind if considering this pump:
• The pump takes a fair-sized stream to operate in. If the pump touches the side or bottom of the channel it will quit pumping. The smallest pump on the market takes a stream that is at least one foot deep with adequate velocity.
• The pump must be anchored well to keep it in place.
• These pumps are subject to curious passers-by if located on a stream used for fishing or canoeing.
• They can be easily disrupted and damaged by high water flows.
• The water tank that it pumps to must have an overfl ow so excess water can be removed from the area to prevent formation of mudholes. There is no way to put a system on the pump to stop flows when the tank is full.
Solar Pumps
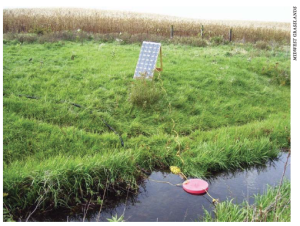
One type of solar pumping system. This one pumps whenever the sun shines on the solar panel. It is set up in a paddock adjacent to the one with the livestock to avoid livestock damage to the solar panel. It pumps to a tank in the paddock with the livestock.
Solar pumps come in a variety of confi gurations. One common type is directly connected to a solar panel. It operates all the time when the sun is shining. Another type is actually a battery operated pump connected so that the solar panels charge the batteries. Th is type can be easily regulated to turn on and off as water use dictates.
Important considerations for solar pumps include:
• They may be expensive, although the cost varies considerably depending on the basic design.
• They require a three day water supply in reserve unless battery powered.
• They can draw water from open water sources or wells.
• They can be used to power a pressurized system to push water for long distances.
Engine Powered Pumps
Engine powered pumps are capable of pumping large volumes of water for long distances and more than 100 feet of elevation. The cost is generally reasonable.
Important considerations for engine powered pumps include:
• You must protect them from flood waters.
• The machine pumps water until it is shut down or it runs out of fuel. Some operators know about how long they want the pump to run and put a small amount of gasoline in the tank and let it pump until it runs out of fuel. Some overflow of the tank may occur and should be directed away from the tank.
In all cases with watering systems that pump from flowing streams, it is important to flood-proof the installation as much as possible. Many of the options described above will suffer serious damage during floods. All systems require some maintenance. They cannot be put into place and expected to operate without any attention.
The positive aspect of these systems is that they will provide water in locations where electricity is not available or where water cannot be pumped or hauled. In this respect, they are well worth considering.
Livestock Watering System Layout
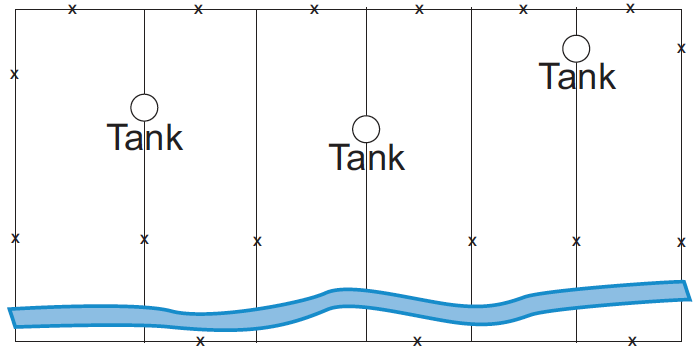
The placement of tanks is restricted, to a large degree, by the kind of pump chosen and the source of water. Pumps can draw water for only relatively short distances, but some can push the water for very long distances.Below is an example of water tank placement in paddocks.
When considering tank placement, major drawbacks to having livestock travel long distances to water, even in travel lanes, is that they tend to deposit a significant amount of their manure in the lane that leads to and from the watering facility, and that they tend to lounge in the area of the watering facility. These issues defeat two major advantages of managed rotational grazing systems: keeping the livestock on the desired paddock so that they consume forages, and spreading the fertility (in the form of feces and urine) through the entire pasture rather than at lounging areas and watering points.
September 08, 2014
Eight Ways to Beat the Summer Pasture Slump
Major symptoms of drought-stressed plants are slow orstunted growth, yellow-brown leaf color, and sometimes curled grass leaves or wilted legume stems.
This will negatively affect plant growth and ultimately animal performance, resulting in economic loss. Here are several ways to beat summer slump for forages and pastures.
1. Plan ahead. Nobody knows exactly what kind of summer weather we will have but producers should prepare for the worst scenario from hot and dry weather conditions.
2. Leave 3 to 4 inches residual. Close grazing in early spring leaving a 2-inch residual helps pastures prepare for summer slump by encouraging grasses to tiller and thickening the stand. As the summer slump approaches, leave more residues (approximately 3 to 4 inches).
3. Stretch grazing rotations. In spring, pasture paddocks are rotated more frequently (every 20 days) due to fast plant growth. However, hot and dry summer conditions result in slower forage
growth. Therefore, paddock rotations should be stretched to every 35 to 40 days. This will give each paddock more time to recover and allow for more residues to cover the soil.
4. Graze hay fields as needed. During the summer slump period, grazers can bring other hay fields into the pasture system if they start to run out of pasture.
5. Consider warm-season annuals or perennials. Whencool-season forages are in a summer slump, warm- season annuals (sorghum-sudangrass or millets) and
perennials (switchgrass) were still able to grow.
6. Watch your fertilizer. Fertilizing pasture with nitrogen, phosphorus, and potassium at green-up and after first and second grazing cycles prior to dry conditions will help it survive a drought
better than poorly fertilized pasture by having healthy stands and roots.
7. Restore drought-damaged pasture. Do not graze too early or overgraze drought-damaged plants too soon. If pasture is grazed soon after the drought is over, there won’t be enough plant materials left for photosynthesis.
8. Extend the grazing season. Last thing to consider is how to replace lost summer forage yield due to dry weather. Consider a fall annual forage crop like brassicas (forage rape, turnip, or kale) or small grain forage to extend the grazing season and reduce the need for supplemental feeding of harvested forage.
